
In this tutorial I update my previous post on configuring in-circuit debugger for STM32F4 using the following open source tools:
- Eclipse Luna (4.4.1);
- GNU ARM Eclipse Plug-ins;
- GCC ARM Embedded Toolchain;
- My project wizard.

1. Prerequisites
- Ubuntu 14.04 LTS (x86 architecture).
- Eclipse C/C++ IDE for Luna SR1 (requires manual installation; direct link).
- STM32F4 Discovery Board (ARM architecture, costs less than 20 EUR).
- Complete the Template Project with Generic Makefile.
- Or at least go through chapter 2. Below is a quick-and-dirty instruction summary if you decide to stay on this page.
cd ~
# Remove the official package
sudo apt-get purge binutils-arm-none-eabi \
                   gcc-arm-none-eabi \
                   gdb-arm-none-eabi \
                   libnewlib-arm-none-eabi

# Add 3rd party repository
sudo add-apt-repository ppa:terry.guo/gcc-arm-embedded
sudo apt-get update
# Check the GCC package version in the PPA repository
sudo apt-cache policy gcc-arm-none-eabi

# Install
sudo apt-get install build-essential git openocd \
             gcc-arm-none-eabi

# Clone my git repository and init submodules
git clone https://github.com/istarc/stm32.git
cd ~/stm32
git submodule update --init
2. Install Software Dependencies
2.1 Install Eclipse
Install Eclipse Luna (4.4.1) release for Linux 64-bit for C/C++ developers. Assuming you downloaded the file to the Download folder, execute the following commands to install Eclipse.
cd ~/Downloads
# Untar and move to home folder
sudo tar xzf eclipse-cpp-luna-SR1-linux-gtk-x86_64.tar.gz
mv eclipse ../
# Start the Eclipse from the command-line
~/eclipse/eclipse &
Be sure to start the Eclipse from the command-line, import the old workspace and install GNU ARM Eclipse plug-ins as follows.
- Help → Install New Software… → Add…
- Add the GNU ARM Eclipse plug-ins repository.
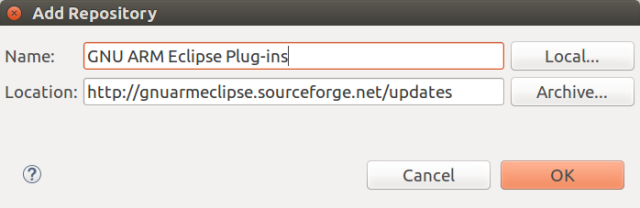
- Install the plug-ins.


2.2 Check the OpenOCD version
Check the OpenOCD version and build from scratch, if necessary.
openocd --version
If it is less than 0.9.0, then I recommend you to build the program the from the source in 7 very simple steps as follows (due to some issues with STM32F4). You may find the OpenOCD at /opt/openocd.
# Install build dependencies
sudo apt-get install eclipse-cdt libtool libftdi-dev \
                     libusb-1.0-0-dev \
                     automake pkg-config texinfo
# Clone OpenOCD project
git clone \
 git://openocd.git.sourceforge.net/gitroot/openocd/openocd

# Configure OpenOCD
cd ~/openocd
./bootstrap
./configure --enable-maintainer-mode \
 --disable-option-checking \
 --disable-werror \
 --prefix=/opt/openocd \
 --enable-dummy \
 --enable-usb_blaster_libftdi \
 --enable-ep93xx \
 --enable-at91rm9200 \
 --enable-presto_libftdi \
 --enable-usbprog \
 --enable-jlink \
 --enable-vsllink \
 --enable-rlink \
 --enable-stlink \
 --enable-arm-jtag-ew

# Build and Deploy the OpenOCD project (/opt/openocd)
make # Build
sudo make install # Install
3. Create a New Project
Create a new project using my project wizard with the mbed-none argument that creates a bare-metal project with mbed SDK support.
mkdir -p ~/stm32/examples/icd-test
cd ~/stm32/examples/icd-test
../../mbed-project-wizard/gen-stm32f407-GCC-project.sh \
                                                    mbed-none
4. Import the Project
Switch back to Eclipse and import the newly created project.
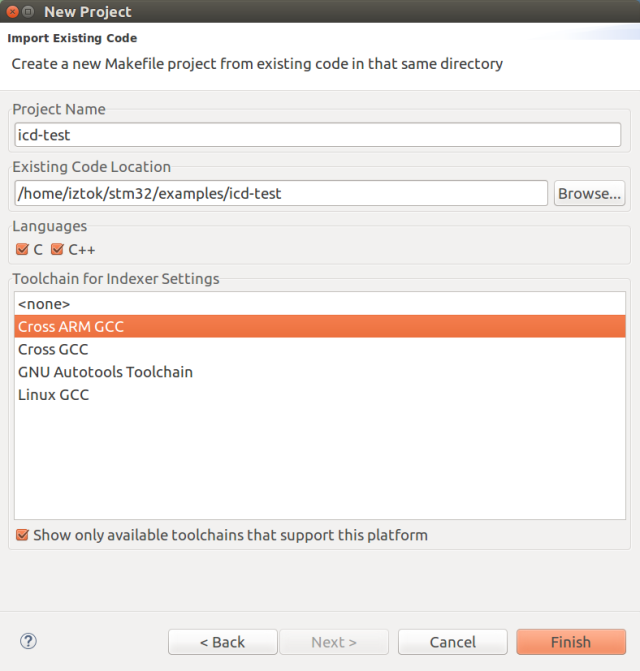
- File → Import… → C/C++ → Existing Code as Makefile Project
- Browse… → Navigate to ~/stm32/examples/icd-test and select Cross ARM GCC toolchain.
- Manually import make targets.
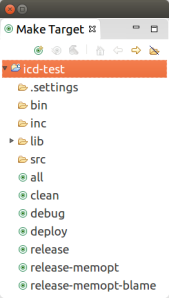
- Navigate to Window → Show View → Make Targets.
- Expand the project directory.
- Right click on the project directory and add a new target by filling in the target name.
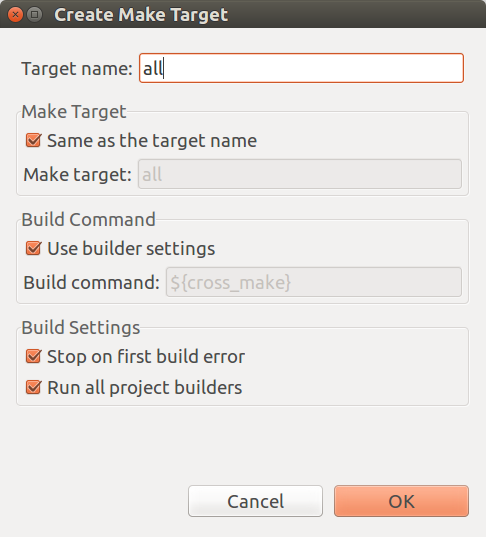
- Repeat the previous step for the remaining targets: release, release-memopt, release-memopt-blame, debug, clean, deploy.
- You may check the project’s Makefile for additional targets.
- You may check the project’s Makefile for additional targets.
- Import the GNU ARM toolchain environment settings.
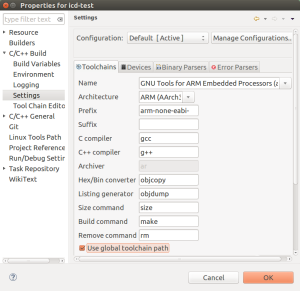
- Navigate to File → Properties → C/C++ Build → Settings.
- Deselect “Use global toolchain path” option.
- Then reselect it again! This is a hotfix for GNU ARM Eclipse Plug-ins to import environmental variables correctly.
- Verify the hotfix (optionally).
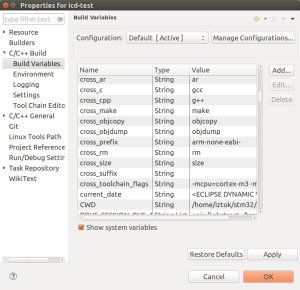
- Navigate to File → Properties → C/C++ Build → Build Variables.
- Enable show system variables.
- Check cross_make value.


4. Configure In-Circuit Debugger
- Build the debug target.
- Navigate to Project → Make Target → Build… → clean (or [Shift + F9] → clean).
- [Shift + F9] → debug.
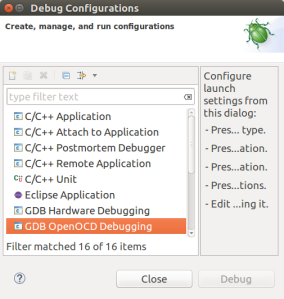
- Create a new debug configuration by navigating to Run → Debug Configurations… → Right click on the GDB OpenOCD Debugging option.
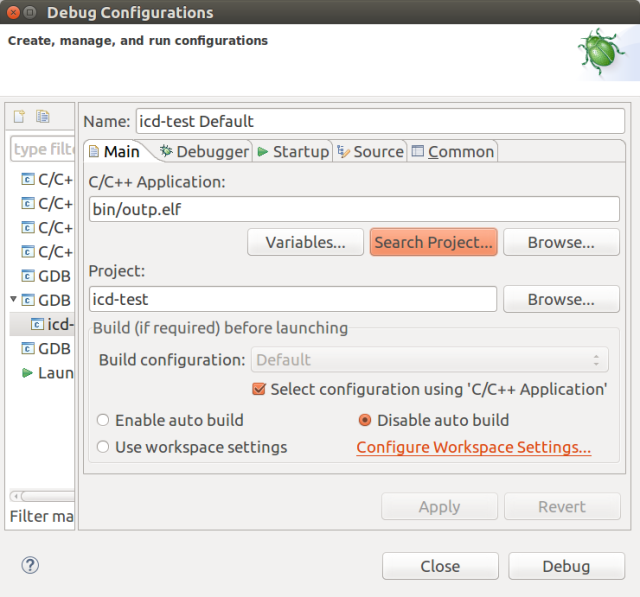
- Configure the debug configuration
- Provide the path to the binary file and select the “Disable auto-build” option — you can optimize that later. 😉
- Provide the path to the OpenOCD executable and to the STM32F4-Discovery script.
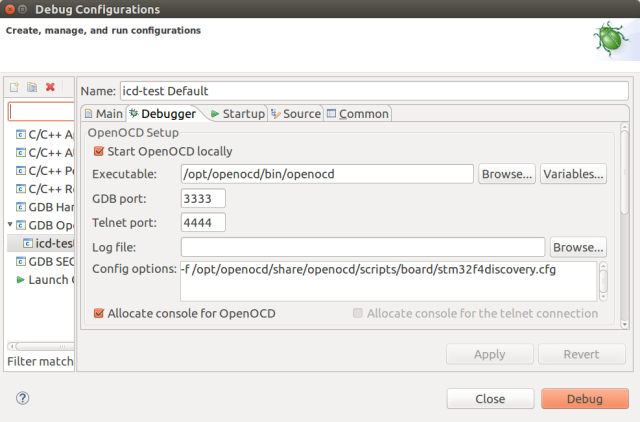
- Provide the path to the binary file and select the “Disable auto-build” option — you can optimize that later. 😉


5. Start Debugging
- Edit the main.cpp file in the src folder.
- Add a counter variable (see the figure below, line 19).
- Increment it before turning on/off LED (see the figure below, line 22 and 26).
- Build the debug target.
- [Shift + F9] → clean.
- [Shift + F9] → debug.
- Run → Debug Configurations… → Double click on the new debug configuration.
- Wait a few seconds and then step through the code (F5).

Hello Iztok,
thanks for your very good tutorials.
I’m a beginner in LINUX, ARM and eclipse. I come from Arduino and want to go the next step further in programming. My goal is to run and understand Benjamin Vedders VESC which I allready build. As it is not running I like to go through his software with the help of the debugging tools but when I follow your tutorial I’m faced with the following problem at the point :
” File → Import… → C/C++ → Existing Code as Makefile Project
Browse… → Navigate to ~/stm32/examples/icd-test and select Cross ARM GCC toolchain. …”
I only have the choise etween “Cross GCC” and “Linux GCC” !?
Maybe I missed one of your tutorials, or what went wrong?
Thanks for your help
Max
Hi Max,
Perhaps you forgot to install GNU ARM C/C++ Cross Development Tools plugin. Check the section 2.1. I hope this helps you further.
Best regards and good luck with your project,
Iztok
Thanks again for another great tutorial!
Because I struggle with debugging in QTCreator since I had to re-instal my development laptop I tried to debug with eclipse following this tutorial.
I used nwer eclipse moon 4.4 but SR2 instead of SR1 and encountered some differences:
diff 1:
At point
4. Import the Project
4.4 Import the GNU ARM toolchain environment settings.
There was no checkbox to unselect and re-select ‘Use global toolchain path’
so I did nothing there.
I continued 4.4D to verify the hotfix and it already looked like the screenshot for the entry cross_make. (Type:String, Value:make)
diff 2:
At ‘Run’ and ‘Debug configuration’ I had to change the debugger in the tab ‘Debugger’ which is next to ‘Main’ and ‘Startup’.
Default was sth like ${gdb_prefix}gdb${gdb_suffix} (I don’t remember) but because these variables were not set my eclipse was trying to use /usr/bin/gdb instead of /usr/bin/arm-none-eabi-gdb.
I saw this because I remembered seeing that arm-none-eabi-gdb is 7.8 when using QTCreator but the console printed 7.7.1 which is the same as /usr/bin/gdb –version.
So I set manually ‘arm-none-eabi-gdb’ in the field GDB Client Setup => Executable
If arm-none-eabi-gdb is not in your PATH we need to use /usr/bin/arm-none-eabi-gdb of course.
I’m not sure if these problems are relates (I would expect 2 to work without the adjustments if all variables are set correctly which I wasn’t able in diff 1) or it this is because of 4.4 SR2 instead of the tutorial-recommended 4.4 SR1 (which I doubt) but anyway – I just wanted to share my experience to help other people.
Hi Dennis, thx for your feedback. Of course, some things change over time, so the tutorial is not up to date anymore, but still can be used as a rough guide to setup in-circuit debugging environment. Thx and best regards, Iztok.
Hi, Iztok. Thank you so much for what you do on this site. I’ve spent way too many hours trying to get an ARM development toolchain running. I’ve evaluated Keil, CooCox, IAR, CrossWorks, Atollic, Eclipse, and several command line options. Your tutorials, scripts, and code are the only things that have given me meaningful progress.
Eclipse has been the worst part of the whole journey of moving from AVR to ARM. Every week or so I Give Eclipse another shot with another tutorial and always walk away thinking the same thing: Eclipse is a heap of crap. It’s 4:35 AM after more fruitless hours wasted following instructions on http://gnuarmeclipse.github.io. Finally, I run into your tutorial. I will be trying this promptly when I wake up early tomorrow afternoon. Thank you 🙂
My end goal is to Run FreeRTOS and debug using Eclipse. Have you been able to debug in this scenario?
It worked! Thank you 🙂 I did it all in a virtual machine. Time for a snapshot.
Hi Charles, it is great that it worked out for you. 🙂 Best regards, Iztok.